
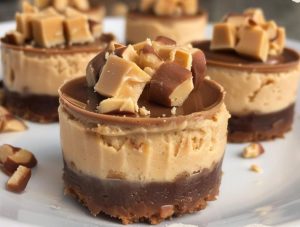
Welcome to a delightful journey of indulgence with our recipe for Irresistible Mini Peanut Butter Cheesecakes! Picture this: a velvety-smooth cheesecake infused with the nutty richness of peanut butter, nestled atop a buttery graham cracker crust, and crowned with a miniature peanut butter cup. Each bite is a symphony of flavors that will transport you to dessert heaven. These mini cheesecakes are perfect for any occasion, from elegant dinner parties to cozy family gatherings. Prepare to elevate your dessert game with this decadent yet easy-to-make treat!
Ingredients Overview:
- 1 cup graham cracker crumbs: These provide the base for the crust, offering a crunchy and buttery foundation for the creamy cheesecake.
- 3 tablespoons unsalted butter, melted: Melted butter binds the graham cracker crumbs together, forming a cohesive crust.
- 12 ounces cream cheese, softened: Cream cheese is the star of the cheesecake filling, lending its rich and creamy texture.
- 1/2 cup creamy peanut butter: Peanut butter adds a delightful nuttiness and depth of flavor to the cheesecakes.
- 1/2 cup granulated sugar: Sweetens the filling and balances the tanginess of the cream cheese.
- 1 teaspoon vanilla extract: Enhances the flavor profile with its warm and aromatic notes.
- 2 large eggs: Provide structure and richness to the cheesecake filling.
- 1/2 cup sour cream: Adds tanginess and creaminess to the filling, resulting in a smooth and luscious texture.
- 1/4 cup powdered sugar: Used for dusting the cheesecakes before serving, adding a touch of sweetness and elegance.
- Mini peanut butter cups, for garnish: These adorable additions not only make the cheesecakes visually appealing but also add an extra burst of peanut butter flavor.
Step-by-Step Cooking Instructions:
1. Preheat the Oven: Begin by preheating your oven to 325°F (160°C) for the perfect baking environment.
2. Crust Preparation: In a bowl, combine the graham cracker crumbs with the melted butter until the mixture resembles wet sand. This ensures a sturdy and flavorful crust. Press approximately 1 tablespoon of the mixture into the base of each cupcake liner, using the back of a spoon to compact it firmly.
3. Filling Mixture: In a large mixing bowl, beat the softened cream cheese until smooth and creamy. Add in the creamy peanut butter, granulated sugar, and vanilla extract, then mix until well combined and fluffy. Beat in the eggs, one at a time, ensuring each is fully incorporated before adding the next. Finally, fold in the sour cream until the mixture is velvety-smooth.
4. Assembly: Spoon the luscious filling over the prepared crusts, ensuring each cup is filled almost to the top with the creamy mixture. Smooth the tops with a spatula for a professional finish.
5. Bake: Place the muffin tin in the preheated oven and bake for 25-30 minutes, or until the cheesecakes are set around the edges but still slightly jiggly in the center. Avoid overbaking to maintain a creamy texture.
6. Cool: Once baked, allow the cheesecakes to cool in the pan for 15 minutes to prevent cracking. Then transfer them to a wire rack to cool completely, allowing the flavors to meld and the texture to set.
7. Chill: After cooling, refrigerate the cheesecakes for at least 2 hours, or until they firm up and achieve the perfect consistency. This chilling step is crucial for the cheesecakes to reach their full flavor potential.
8. Garnish: Just before serving, dust each cheesecake with powdered sugar for a touch of elegance, and top with a mini peanut butter cup for an irresistible finishing touch.
Storage and Reheating Tips:
To store these delectable mini peanut butter cheesecakes, simply place them in an airtight container and refrigerate for up to 3 days. For longer storage, they can be frozen for up to 1 month. When ready to enjoy, allow them to thaw in the refrigerator overnight. Serve chilled for the best flavor and texture.
Helpful Tips for Enhancing the Recipe:
- For an extra indulgent twist, drizzle melted chocolate over the chilled cheesecakes before serving.
- Experiment with different types of nut butter, such as almond or cashew, for a unique flavor profile.
- To easily crush graham crackers for the crust, place them in a zip-top bag and use a rolling pin to crush them into fine crumbs.
- Ensure all ingredients are at room temperature before beginning for smooth and creamy cheesecake batter.
- To prevent cracks from forming on the surface of your cheesecakes, avoid overmixing the batter once the eggs are added.
- Customize the garnish by using chopped nuts, caramel sauce, or chocolate shavings in place of mini peanut butter cups.
- For a gluten-free option, use gluten-free graham crackers for the crust.
- To achieve the perfect crust texture, firmly press the crumb mixture into the cupcake liners using the back of a spoon.
- Allow the cheesecakes to cool completely before refrigerating to prevent condensation from forming on the surface.
- To easily remove the cheesecakes from the muffin tin, gently run a knife around the edges before transferring them to a wire rack.
- For added decadence, swirl in some chocolate ganache into the cheesecake batter before baking.
- Experiment with different toppings such as caramel drizzle, chopped nuts, or fresh berries for a personalized touch.
- To intensify the peanut butter flavor, add a tablespoon of peanut butter to the crust mixture.
- For a lighter option, use Greek yogurt in place of sour cream for a tangy twist.
- Serve these mini cheesecakes with a dollop of whipped cream or a scoop of vanilla ice cream for an extra special treat.
Popular Questions and Answers:
Q: Can I use crunchy peanut butter instead of creamy? A: While creamy peanut butter lends a smooth texture to the cheesecakes, you can certainly use crunchy peanut butter if you prefer a bit of added texture. Just keep in mind that the final result may have a slightly different mouthfeel.
Q: Can I omit the sour cream from the recipe? A: Sour cream adds richness and a subtle tanginess to the cheesecake filling, but if you don’t have any on hand, you can omit it. The texture may be slightly denser, but the cheesecakes will still be delicious.
Q: Can I use a different type of sweetener instead of granulated sugar? A: Yes, you can substitute an equal amount of honey, maple syrup, or agave nectar for granulated sugar if desired. Keep in mind that this may alter the flavor profile slightly.
Q: How can I prevent cracks from forming on the surface of the cheesecakes? A: To prevent cracks, avoid overmixing the batter once the eggs are added and make sure not to overbake the cheesecakes. Additionally, cooling them gradually can help minimize cracks.
Q: Can I make these cheesecakes ahead of time? A: Yes, you can prepare the cheesecakes up to 2 days in advance and store them in the refrigerator until ready to serve. Just be sure to add the garnish just before serving for the best presentation.
Secrets for Achieving Culinary Perfection:
- Don’t overbake the cheesecakes; they should still have a slight jiggle in the center when you remove them from the oven.
- Use high-quality ingredients for the best flavor results.
- Allow the cheesecakes to cool completely before refrigerating to avoid condensation.
- Get creative with your garnishes to add visual appeal and additional flavor layers.
- Have patience during the chilling process; this allows the flavors to meld and the texture to set properly.
- Share these delightful treats with loved ones and savor the joy they bring to any occasion.
- For a uniform texture, make sure all ingredients are at room temperature before mixing.
- Use a water bath while baking to ensure even cooking and prevent cracking.
- For easy removal, use non-stick cupcake liners or lightly grease the muffin tin.
- For a decadent twist, swirl in some melted chocolate into the cheesecake batter before baking.
- To intensify the peanut butter flavor, add a tablespoon of peanut butter to the crust mixture.
- Avoid overmixing the batter to prevent air bubbles from forming, which can lead to cracking.
- Allow the cheesecakes to cool gradually to room temperature before refrigerating to prevent cracking.
- Use a toothpick or cake tester to check for doneness; the center should be slightly jiggly but set around the edges.
- Experiment with different flavor variations by adding cocoa powder, cinnamon, or espresso powder to the filling mixture.